How to root croton in water. Reproduction and planting of croton. Croton - reproduction by leaf.
A native of the tropics of Southeast Asia - croton. Effective plant at home reproduces well.
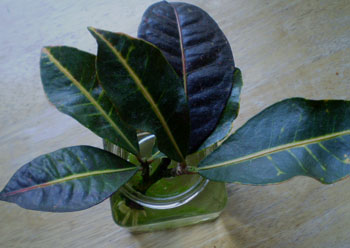
A croton's stalk easily rooted in the water if the process is taken in the summer. Croton needs a mixture of sand, peat, humus, leaf and turf, taken in equal amounts. In spring or summer, once every ten days, the plant is fed.
Reproduction of croton with seeds
Propagate them by cutting the rod, air stratification or, if you are "patient, the rhizome of the petiole." Like other tropical plants, croton need humid, humus-rich soil, which is easily depleted. They prefer high humidity, so they put the pots on the pebble trays to provide additional moisture in the winter. They will acclimatize to reduce humidity during the winter rest period, when growth slows down, but can fall on the lower leaves if the humidity decreases.
In contact with
Growing and reproduction of croton at home
How to propagate a plant at home? Cuttings or seeds? Work with it is better to spend the. Cutting is the most popular method, rarely gardeners use layers. The most complex methods are transplantation by leaf and seeds.
Croton is poisonous. With him care must be taken, wash hands thoroughly after handling the plant. It should be away from the hot battery, but not on the cold sill. The humidity must be monitored: its excess and its shortage are harmful.
When multiplying plants, remember that all parts of the plant contain diterpene esters, which can cause indigestion and skin irritation. Immediately wear gloves or rinse areas marked with milk juice, and avoid getting parts of plants near your mouth. from pets and children, and also to clean and disinfect cutting tools after each use, wiping them with a rag soaked with alcohol. The Crotons grow from 3 to 6 feet in height, so trim them to encourage shrubs.
Take 4 to 6 inches of the tip, carving below the horn node. Erase everything except three or five upper leaves. Click on the cutting in a powdered charcoal or put it on a newspaper to allow the juice to dry. Plant your tenderloin with wet sand or perlite and sphagnum peat moss, then tie a large plastic bag around the pot to make a small greenhouse. Keep the cutting wet and warm - above 70 degrees Fahrenheit - and the cutting should begin within a month.
Landing
For planting Crotona cut the stalk with a pair of internodes and rinse the slice. This removes the film, which prevents rooting.
- The stalk is dipped in powdered corn root and planted in a mixture of sand and earth, ramming it near the plant.
- Croton needs abundant watering with warm water every five days.
- Over the sprout, a hothouse is installed from the film, put the container in a shaded area and ventilate every two days.
Choice of pot
For Croton, capacity is desirable from plastic: it is more convenient for transplantation. To determine the size of the pot, you need to orientate to the size of the croton, but it is better to take a narrower vessel than too loose. Surplus soil "sour" leading the plant to death.
When crotonic plants become leggy, renew them with an air layer of lifeless limbs to stimulate shrub development and provide new plants. Keep the incision open by sliding the usual wooden toothpick in the lateral direction. Apply some hormone hormone powder with a small brush of artists and wrap the wound in a handful of sphagnum moss, moistened with either distilled or purified water. Wrap the moss with a plastic wrap and tie or glue it tight enough that it is closed on both sides of the wound.
Young croton specimens are transplanted annually. Each time the pot is selected more than the previous one by two to three centimeters.
Earth
The soil for the croton must be prepared loose, well drained. The optimal composition is a mixture of one part of sod soils, the same amount of sand, two parts of leafy earth and half of the coal. The earth mixture must be boiled in two containers.
When the roots start to appear against the plastic, cut the stem below the layer, remove the plastic and plant your new plant in peaty loam. During the month, the feeding should be warm. Spreading a crotonic plant is as simple as cutting or breaking a branch and transplanting it. Croton plants and many other perennials and tree shrubs have cells in leaf nodes that develop roots in the right environment. Areas of alienation from 9 to 11 sectors of agriculture, depending on the variety.
Possible problems in the cultivation of the ciconium
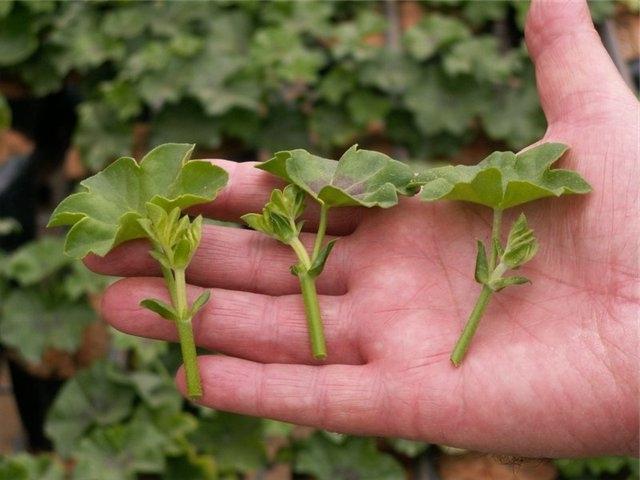
Use the tips of the cuttings to spread the croton. Cuttings of the tip are 3 to 6 inches of branch, taken from an actively growing croton bush. Choose branch tips that have 3 to 5 leaves at the top. Use a pair of clean sharp scissors for trimming when cutting branches for rooting and creating cuts at an angle of 45 degrees. You can take and root the croton twigs at any time during the growing season. Just find the stems that begin to turn from green to slightly woody.
The lower quarter of the pot, in order to prevent the stagnation of moisture, is filled with charcoal, expanded clay, clay skulls for drainage. It is necessary to observe the acidity of the soil from 6.1 to 6.5.
Reproduction
Cuttings
How to plant a croton with a handle? How correctly to cut? The most suitable spring cuttings are spring.
Use a combination of equal parts of perlite and peat moss or vermiculite and peat moss for root crotonic cuttings or buy a bessus root material. Keep the soil between 70 and 80 degrees Fahrenheit during the rooting process and with water when it begins to dry out.
This is a good way to control the development of roots. Transplantation of root crotonic branches in 4-12 weeks. You can transplant the cuttings into 4-gallon nurseries filled with potted soil, or plant cuttings directly into the garden. Crotones of plants in areas that receive filtered sunlight or in a partially shaded area. Provide plants 1 cm of water per week in dry weather. If it is rainy, water only when the amount of rain falls below 1 inch per week.
From a lignified stalk from March to April are cut eight to ten centimeters of the upper cuttings. It is advisable to leave one kidney and two leaves. The cut is straight. The extracted milky juice is gently washed off with warm water, and the cut is sprinkled with pounded charcoal.
The stalk is dried, the lower part is treated with growth stimulators, and the leaves are shortened by half or tied in a tube to reduce evaporation. Plant new crotones one by one in a pot, with a diameter of at least seven centimeters.
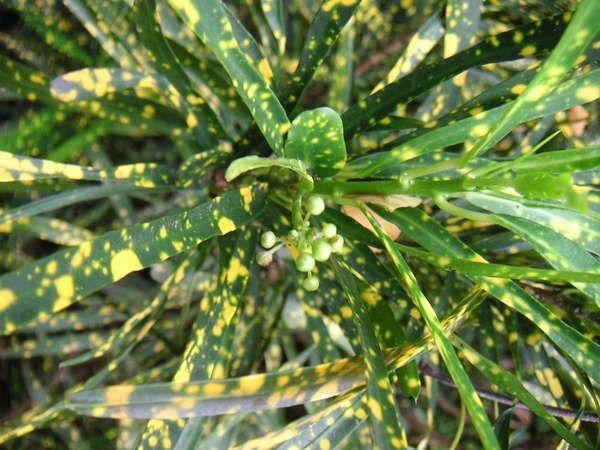
Croton varieties have leaves from fiery orange, yellow and red to spotted green and yellow. Small white, plump flowers are not a focus on the Croton, so choose the variety that you like. The leaves of the flame grow yellow, green and red on the same bush. The value for its shiny leaves in shades of red, green, yellow, purple and orange colors, crotones, adds color to the environment. Although croton is grown as an internal plant in most climates, it thrives outdoors in the frost-free climate of arid zones from 24 to 27, and X Croton easily propagates by stem chopping or air stratification.
If it was not possible to prepare the soil, rooting is permissible in sand or water. Its temperature is from 23 to 30 degrees. At a lower temperature, the risk of rotting cuttings increases, and a higher one can slow down growth and provoke the death of some plants. Obligatory organization of indirect light in sufficient quantity.
Spreading by rooting a stem from a healthy mature plant is a method commonly used to spread croton and many other indoor plants. Roots include cutting the stem with at least three sets of leaves. The wound is created by removing the lower set of leaves, and new roots are formed at the site of the wound. The stock is planted in a container filled with a light mixture, and then covered with plastic to create the atmosphere of the greenhouse.
Air stratification is a method of propagation in which a rod is introduced when it is still attached to a plant. The process involves the manufacture of a diagonal cut at a third of the diameter of the stem. The wound is treated with an ingrained hormone and kept open with a piece of toothpick or match. Wet moss sphagnum is packed around the area, while the moss is carefully covered with plastic film. When the roots of the stem are planted in a container filled with light primer or a mixture of ingredients such as perlite, sand and peat.
The most beautiful and strong plants grow from the apical cuttings. If it is necessary to obtain several new plants, then cut the trunk between the leaf nodes into several parts. On a rooting suitable for rooting, there must be at least one sheet of sufficient rigidity.
How to root a croton stalk? For early rooting, growth stimulators will be required. When the roots reach two centimeters in length, one can root the stalk in the soil.
Watering the croton a day before spreading promotes rooting and minimizes stress for the plant. It is important to keep the moisturizing medium slightly moist. Cutting the rod in a plastic-coated container often remains moist for several weeks. Nevertheless, the pouring soil is checked two or three times a week and fog, if it starts to feel dry. For a stalk that spreads by layering, sphagnum moss turns the tan when it becomes dry. When this happens, the plastic is temporarily removed and then replaced after the moss is misted.
Special care the plant needs in the next few weeks. It is often and abundantly sprayed, the air at a constant temperature of eighteen degrees must always be moist, the lighting scattered. If all the requirements are met, the rooting will take no more than a couple of weeks.
Understand that everything went well, you can to increase the elasticity of leaves. The composition of the soil for the entrenched cut is equal parts of humus, turf and leaf earth, peat and sand.
Indirect sunlight is important for any propagation technique, since bright light can cause a plant burn. Croton likes bright sunlight, but it benefits from a partial or filtered shade on hot summer days. Too much sunlight whitens the colors in the leaves. Watery mildew until the water seeps through the drainage hole when the upper part of the soil seems dry, and then allow the drain to flow freely for 30 minutes. Use a liquid fertilizer for a houseplant, mixed with half the solution recommended in the strength container.
Layers
When the stalk of an adult croton is bare, reproduction is used by air layers. The best time for taking away is summer. There are two methods. At the first on a bare branch, a centimeter-wide incision of the cortex is made in a circle. From the end they retreat no more than 15 cm.
- After processing, a dark bag is put on top of the plant.
- The lower end of the layer is tied with a string, and when the upper end is secured, moisture is allowed to remain.
- After the emergence of sturdy five centimeter roots underneath cut the stalk.
- It is transplanted into a pot, covering with a film for a couple of weeks to maintain the necessary humidity.
The second way - bending and fixing a lignified branch to the ground.
Winter care for croton
Keep croton at room temperature around 70 degrees Fahrenheit during the day and 10-15 degrees cooler at night. Protect the croton from cold drafts. Bright sunlight is necessary for a rich development of the color of the leaves. Croton root is easy and hedging is usually multiplied by stem cuttings. Cut large tree branches with a diameter of up to 1 inch and cut everything except the five leaves. Then select a permanent location for the cuttings and shove 4 inches of stems into loose, fertilized soil.
Keep the soil moist, but not moist for the first three weeks. For small plants, take stem cuttings 6 to 12 inches long from the green tree. Leave the cuttings at night with the stems in the water and dip them into the hormone of the hormone before placing them in a pot of perlite, vermiculite or simply sand.
- On the lower edge - an incision. With it, the juice is removed and processed with corn root.
- After the appearance of new leaves and rooting, the plant is separated from the branch and transplanted.
Seeds
Growing a plant from seeds - The method is not easy and is rarely used.
It can also be propagated by air stratification or cuttings of coniferous needles. Lower the end of the cut into powdered charcoal to stop bleeding, and keep the cuttings above 70 degrees Fahrenheit. They must develop the roots in a month or two.
Croton requires a moderate amount of watering. To maintain good growth, regularly feed the croton with a water-soluble fertilizer. Plants are large, but rarely grow to more than 15 feet and can be controlled by trimming the tip to limit their growth and promote artisanal growth. When fast-growing crotonies grow to a height of 4 to 5 feet, they begin to lose their lower leaves, especially if they do not receive enough water. Although pest problems are rare, croton may be targeted for some pests, mainly mealy bugs and small scales.
- Seeds are soaked in January-February in any growth stimulator for several hours. Sow better in February.
- Plant the seeds in a pot of sand-peat mixture, covering the top with a film.
- Mini-teplichke need diffuse light and a stable temperature of 25 degrees above zero.
- Seedlings appear in a month.
For reproduction by seeds use only seeds matured no later than a year ago.
Reproduction of the ciconium by cuttings
The best way to get rid of pests is to apply a suitable pesticide. Stems that are still attached to their parent plant can form roots where they contact the root medium. This method of vegetative propagation is generally successful, because the stress of water is minimized, and the level of carbohydrates and mineral nutrients is high. The development of the roots on the stem, while the stem is still attached to the parent plant, is called a stratification. The layer is the root rod after separation from the parent plant.
When propagating by seeds, the varietal characteristics and qualities of the plant are not preserved.
First the seeds disinfect in hot water. For swelling they are left in water for a day. Then planted in heated soil. Until the seeds germinate, they need a lower watering. After germination, the shoots are transplanted separately.
In pots filled with a mixture of humus, sand, peat or chopped sphagnum, make a groove with grooves, and cuttings one at a time. At the base of each earth is compacted.
Croton - propagation by cuttings
Some plants reproduce naturally, but sometimes propaganda plants help this process. Sealing is enhanced by injuring the stem, where the roots should be formed. The root medium should always provide aeration and a constant supply of moisture.
Simple layering can be performed by bending a low-growth flexible rod to the ground. Cover it with soil, leaving the remaining 6-12 inches above the soil. A sharp bend often causes rooting, but the wounding of the underside of the curved branch can also help. Simple layers can be performed on most plants with low-growing industries. Examples of plants multiplying by a simple layer include climbing roses, forsythia, rhododendron, honeysuckle, boxwood, azalea and wax myrtle.
In summer, the plants are left in water at a temperature of 25 degrees with diffuse light. To achieve the greenhouse effect, the pot is covered with a jar or a packet.
Twice daily, small croton sprayed and aerated, to harden plants. Rooting takes about a month and a half. After that plants are planted on separate pots.
Sheet
Reproduction of croton by leaves - a rare method: after all, you can not guarantee a positive result.
- Cut with a sharp knife sheet with a piece of stalk washed with water and put in a plastic cup with moist peat.
- Wrap a glass with a plant in polyethylene and leave until completely rooted in a light cool place. Root a leaf can take a long time.
- After braiding the roots of the whole earthen coma, you can plant the young croton in a separate pot.
Reproduction of the croton requires time and patience. Care and attention - the main rules. If you follow them, you can grow any Croton in any of the available ways. Success is guaranteed.
Attention, only TODAY!
In contact with
Do you see inaccuracies, incomplete or incorrect information? Do you know how to make an article better?
Do you want to propose for publication photos on the topic?
Please help us make the site better! Leave a message and your contacts in the comments - we will contact you and together we will make the publication better!
Croton (codaium) is a popular houseplant. Its content is considered a troublesome occupation. Possessing the knowledge necessary for croton to care at home, it is possible to provide him with the necessary conditions for development. This tropical plant in nature is found in southern India, Sri Lanka, Indonesia, Malaysia and the western islands of the Pacific Ocean. There are many varieties of croton with leaves of a wide variety of shapes and colors. They are short, long, curly, thin and thick. Colors range from yellow and green to purple and black, and also occur in combination.
The tropical origin of the cynomia nursing at home makes it more difficult than conventional plants. Watering, humidity, soil, sunlight and temperature should correspond to those in natural conditions. Diseases and pests can become a problem, but knowing certain rules, everything can be checked and corrected.
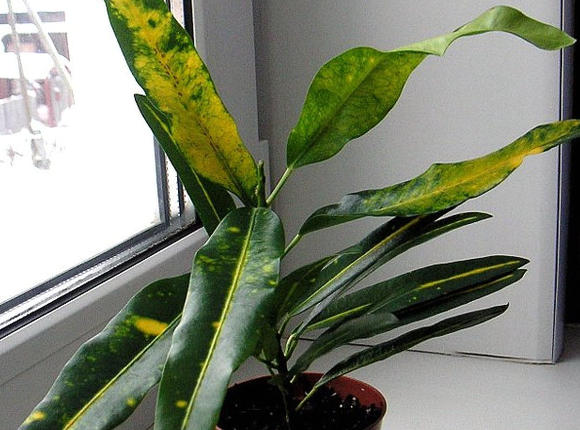
One of the reasons that the croqueta croton has a reputation for problematic care is a poor first impression. It often happens that a person brings a flower to the house from the store, and leaves begin to fall off. This immediately causes the owner to question how to take care of croton at home.
This behavior of the plant can be considered absolutely normal. This is because the flower coding does not like any movement. Because of this, he comes to a state of shock, which leads to loss of foliage. Therefore, such situations should be avoided. If displacement is inevitable, do not panic because of falling leaves. It is necessary to observe proper care for croton at home, and after a short period of time he will please the hosts with a dense crown of brightly colored leaves.